Quick start
You can install CloudWall as a set of files at a static hosting, or as a couchapp into your CouchDB, which is preferable. If chose latter, you need CouchDB installed and properly configured, please follow instructions to fulfill prerequisites.
Setup as a Couch hosted app
Preferable hosting for CloudWall is native CouchDB. There are two ways to install CloudWall into Couch.
First way is to download cw-2.4.4.json, then put it into any CouchDB bucket you like, and then run index.html.
Second way is to replicate from the repo DB, then optionally to setup vhosts configuration. To replicate CloudWall dev stand create below doc in the _replicator DB of your Couch:
Please, don‘t make sync continuous, repo is of very limited capacity!
Above code installs CloudWall and Photon, which is alternative CouchDB admin panel.
CloudWall now can be started from mydomain.com/cloudwall/_design/cw24/index.html. Bit long URL, to make it shorter set up domain binding.
First run as a couchapp
CloudWall dev stand if it starts from Couch checks if user is authorized by CouchDB. If not, user is asked to provide CouchDB credentials.
If user has _admin role, CloudWall automatically creates new remote CouchDB bucket to store user’s profile and apps. For non-admin users an admin should create profile bucket for each user manually. Use widget at right to derive new DB name from username.
If required remote bucket exists, the user is prompted to enter PIN code for local profile. PIN protects sensitive data when stored inside browser.
Custom builds may not require local profiles, so it’s possible to build CW-based system not requiring a personal remote DB for storing each user profile.
Domain binding
To bind your CloudWall instance to a dedicated subdomain first create valid DNS A-record, pointing to CouchDB IP. Then go to CouchDB config editor, and create/modify below keys:
That makes CloudWall reachable at cw.mydomain.com/, the domain root. Note, that dev stand’s rewrite rules also make entire CouchDB available from the domain root, to allow in-domain auth and DB sync.
Accessing cw.mydomain.com/_photon/ runs Photon dashboard.
The profile.json attachment of _design/cw24 contains default user profile, which includes default list of DBs user connects at start. Edit this attach to make up the list.
Setup for static hosting
Download cw-2.4.4.zip, unpack it and point your site root to index.html. That is all.
File profile.json contains default user profile which includes default list of buckets a user connects at start.
First run from a static hosting
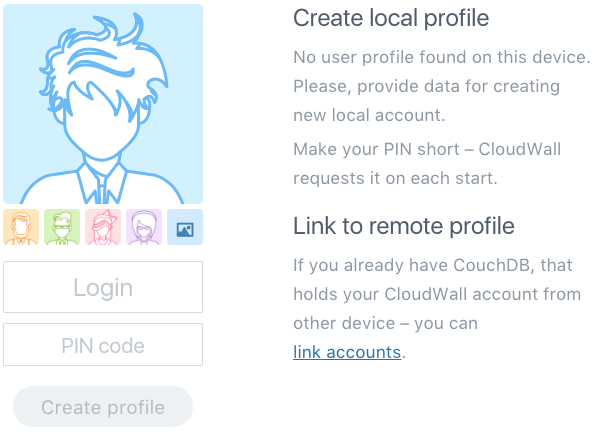
‘Create profile’ dialog
When user runs index.html on a new device, CloudWall requests local user profile set up. There are two ways:
1. Create new profile
If you run CloudWall first time, your local profile is created automatically. It‘s a special local DB, containing system apps, list of your DBs and their syncs, your cryptokeys, list of read docs and last seen revisions, and so on.
This local DB is named ‘System DB’ and keeps all sensitive information encrypted and protected by PIN code. You should provide one to protect your passwords and cryptokeys.
CloudWall will asks for PIN, if any, on every page reload, so do not make it excessively complex.
2. Clone existing profile
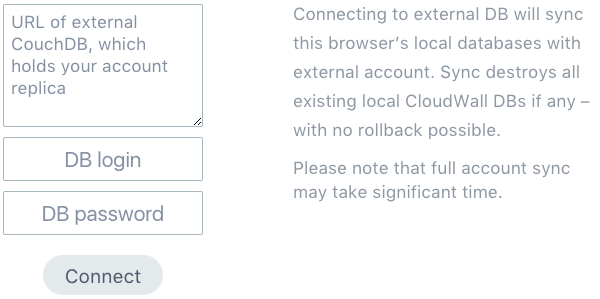
‘Link with existing profile’ dialog
If you use CloudWall you have System DB inside your device‘s browser. System DB is just one of local buckets so it may be synced with remote CouchDB. It means you can have a remote copy of your profile.
If one device’s System DB is synced with a CouchDB bucket, you may sync it back to new device — and have same set of DBs and apps on both devices.
To link new device with your account click ‘link accounts’ at right bottom. Provide URL of a remote CouchDB bucket with your profile, credentials — and you’re done.
Dashboard and Shell
On start you will see Dashboard, which is basically a list of buckets. Dashboard also opens when you click top left logo.
Each card is a bucket. Each bucket may be configured to sync with several remote or local buckets, and each sync may be filtered.
If profile is editable, last card contains profile actions: you can add more buckets. Also you can configure existing buckets, changing syncs, icon, or removing (detaching) bucket completely.
To avoid browser connections pool exhaustion buckets may sync not only continuously, but also intermittently in predefined intervals.
Clicking bucket title in Dashboard opens another app, Bucket Shell, which is default bucket browser. It provides navigation, apps and editors start, filtering, and also very basic search. All screenshots below are showing Bucket Shell.
Demo apps & docs
If original profile.json file/attachment was not changed, on the first start you should probably see Demo & Docs bucket, with appearing (syncing in) demo apps, samples and CloudWall documentation. It might look like this:
Each member of the doc list has 2 clickable zones: title, which opens doc, and icon which opens doc properties popup. So icon behaves somehow like right mouse click, calling context menu, this approach is useful for touch devices.
Doc info dialog also provides several additional operations, like copying/cloning, raw JSON view, diff, delete and hide.
Left column is a list of available filtering options. Tagging docs effectively substitutes folder organization.
Built-in apps
CloudWall installs several apps in local System DB, they are available system-wide in each bucket. Apps are divided into two big classes: “just apps” and editors. On the screenshots below “just apps” go first, list of editors goes second.
Each editor is specially intended for processing its own type of document, so documents of a type receive their editor icon. Clicking a doc in a list will run editor, which then opens the doc. “Just apps” are more generic, they are not bound to specific doc type.
There are 15 apps, editors and utilities out of the box:
You can view/edit each app’s source code. To view/edit source code of any built-in app, open System bucket, then click app’s icon in docs list, and then click Edit command button in the doc info popup.
Get sources
CloudWall was created inside CloudWall, so its sources exist only like a set of CouchDB docs. To get sources you need CloudWall running. Then, step by step:
- Go to Dashboard (click top left logo for this), then click Add new bucket… button in the last card.
- Type simple name, like
lab, create the bucket, and then open it with Shell. - Run app Apply DB Dump, and provide dump URL
https://cdn.cloudwall.me/2.4/cw-2.4.3-dev.jsonfor the app. - Click Apply button in the app, it will download ~25Mb from CDN, so wait a little.
- Keep all checkboxes set and confirm doc creation.
- Have ~65 docs added to your local in-browser bucket.
After process finished, the dump downloader closes, and bucket shell should show something like this:
This set of CloudWall sources is enough to re-build CloudWall. The builder is in CW 2.4 Full build doc, opening it and clicking ‘To Couch’ button builds _design/cw24 ddoc in current bucket.